If your energy bills have jumped 15–30% year-over-year or certain rooms stay stubbornly uncomfortable despite cranking the thermostat, the culprit likely isn’t just your HVAC—it’s the broken partnership between your heating/cooling system and your home’s insulation. According to the EPA’s Home Energy Yardstick, homes with poor envelope sealing waste up to 30% of conditioned air.
This guide walks you through how these two systems interact, which upgrades to prioritize, and how to make smart decisions without wasting money on the wrong fix first.
Why HVAC and Insulation Must Work Together
Here’s the truth: most homeowners tackle HVAC and insulation as two separate problems—and that’s exactly why their energy bills keep climbing. They replace a furnace when it fails or toss in attic insulation after a shocking bill—but they rarely connect the dots: poor insulation forces your HVAC to overwork, slashing equipment lifespan and inflating monthly costs.
Your HVAC system is sized based on how much heat your home gains in summer and loses in winter. If your insulation is poor, your HVAC has to work much harder to compensate. This shortens equipment lifespan, increases energy consumption, and still leaves you with uneven comfort. Improving insulation first reduces the load on your HVAC — which means a smaller, less expensive system can do the job better. A proper ACCA Manual J load calculation accounts for your home’s actual insulation levels, ensuring your new HVAC system isn’t oversized (and wasteful) or undersized (and uncomfortable).
How Heat Moves Through Your Home
Think of heat like water—it always flows downhill, from warm spaces to cool ones, escaping your home in winter and pushing in during summer. In winter, it escapes outward through your walls, ceiling, floors, and any gaps in the building envelope. In summer, outdoor heat pushes inward. This movement happens in three ways:
- Conduction — heat traveling through solid materials like wood framing or drywall
- Convection — warm air rising and cold air falling, creating drafts
- Radiation — heat radiating from warm surfaces like sun-baked roof decking into your attic
Insulation slows conduction. Air sealing stops convection losses. Radiant barriers or reflective insulation address radiation. A complete strategy uses all three where needed.
The Thermal Envelope Explained
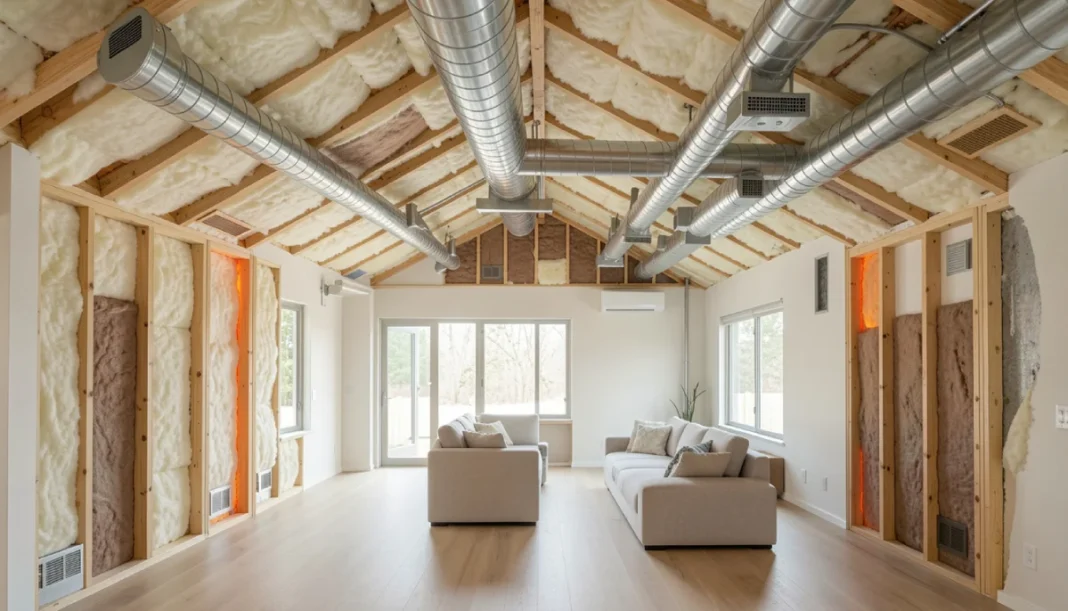
Your home’s thermal envelope is the boundary between conditioned (heated or cooled) space and unconditioned space. It includes the attic floor or roof deck, exterior walls, foundation walls, basement ceiling, and floors over garages or crawl spaces.
The tighter and better-insulated this envelope, the less energy your HVAC needs to maintain a consistent indoor temperature. A leaky, under-insulated envelope forces your system to run longer cycles, increasing wear and operating cost.
Understanding Insulation R-Values
R-value measures thermal resistance — how well a material resists heat flow. A higher R-value means better insulating performance. This number matters because the ideal R-value for your home depends on where you live, where the insulation is being installed, and what type of material you’re using.
R-Value by Climate Zone
The U.S. Department of Energy divides the country into eight climate zones. Use this table as a starting point: find your climate zone on the DOE Climate Zone Map, then match your target R-value. When in doubt, a RESNET-rated energy auditor can validate your specific needs. Here are general recommendations for existing homes:
| Location | Climate Zone 1–2 (Hot/Humid) | Zone 3–4 (Mixed) | Zone 5–7 (Cold) |
|---|---|---|---|
| Attic | R-30 to R-38 | R-38 to R-49 | R-49 to R-60 |
| Walls (cavity) | R-13 | R-13 to R-15 | R-15 to R-21 |
| Floors over the crawl space | R-13 | R-19 to R-25 | R-25 to R-30 |
| Basement walls | R-5 to R-10 | R-10 to R-15 | R-15 to R-20 |
Note: These are general guidelines. Local building codes may require higher minimums. An energy auditor can give you zone-specific recommendations.
Common Home Insulation Types Compared
Fiberglass batts are the most widely used insulation material in residential construction. They’re relatively affordable, easy to install between studs and joists, and widely available. R-value runs around R-3.1 to R-3.4 per inch. The main limitation: batts don’t stop air movement, so they must be paired with air sealing to perform well.
Blown-in cellulose is made from recycled paper and treated with fire retardant. It’s a strong choice for attics because it fills irregular spaces completely. R-value is approximately R-3.5 per inch. It handles air movement better than batts and is a cost-effective DIY option for attic floors.
Spray polyurethane foam (SPF) comes in two types. Open-cell foam is softer, less dense, and provides around R-3.7 per inch — primarily used for interior walls and sound control. Closed-cell foam is denser, provides R-6 to R-7 per inch, and acts as both an air barrier and a vapor barrier. It’s one of the most effective materials available but also the most expensive. Closed-cell foam is ideal for crawl spaces, rim joists, and cathedral ceilings where space is limited.
Rigid foam board (XPS, EPS, or polyiso) is used on exterior walls, under slabs, and in basement applications. R-values range from R-3.8 (EPS) to R-6.5 per inch (polyiso at moderate temperatures). It adds insulation without taking up interior wall space.
Quick decision guide: Choosing insulation? Use this rule: attics → blown cellulose for cost-effectiveness; crawl spaces → closed-cell foam for moisture control; walls → dense-pack cellulose for minimal invasion. Building Science Corporation recommends vapor-permeable materials in mixed climates to prevent moisture traps.
Where to Insulate First — Priority Order
Not all insulation upgrades deliver equal results. The order in which you address them matters for both performance and budget.
1. Attic and Roof
The attic is the single highest-return insulation project in most homes. Heat rises, so an under-insulated attic floor loses more energy than almost any other area. Most older homes have R-11 to R-19 in the attic — far below current recommendations of R-38 to R-60, depending on your climate zone.
Before adding insulation, air seal all penetrations — recessed lights, plumbing stacks, electrical chases, and the top plates of interior walls. These gaps allow warm conditioned air to escape directly into the attic. Skipping this step and just adding blown insulation is one of the most common and costly mistakes homeowners make.
2. Walls and Floors
Exterior wall insulation is harder to upgrade in existing homes without opening up wall cavities. In many cases, dense-pack blown-in insulation can be injected through small holes drilled from the exterior, then patched and repainted. It’s a minimally invasive option that adds meaningful performance.
Floors over unheated spaces — crawl spaces, garages, or unconditioned basements — are often under-insulated. Batts installed between floor joists help, but they must be properly supported so they don’t sag and lose contact with the subfloor.
3. Basement and Crawl Space
Crawl spaces should be either vented (with a vapor barrier on the ground) or fully encapsulated with rigid foam or spray foam on the walls, a ground vapor barrier, and air sealing. Fully encapsulated crawl spaces perform much better in mixed and cold climates. Basement walls benefit from rigid foam or closed-cell spray foam, especially in climates with significant heating seasons.
Air Sealing: The Step Most Homeowners Skip
Insulation slows heat conduction, but it does very little to stop air leaks. A home with good insulation and poor air sealing can still lose 25–40% of its conditioned air through gaps and cracks. Here’s the kicker: spending $300 on air sealing can save you more than dumping $2,000 into extra insulation—because stopping air leaks tackles the biggest energy waster first.
Common air leak locations include:
- Top plates between the living space and the attic
- Recessed lighting canisters (especially older, non-airtight types)
- Plumbing and electrical penetrations
- Gaps around windows and door frames (not just weatherstripping, but rough opening gaps)
- Rim joists at the foundation level
- Fireplace dampers and chase surrounds
Blower door testing—performed by a BPI-certified auditor—pressurizes your home to pinpoint exact leak locations, turning guesswork into a targeted repair plan. It’s one of the most useful diagnostic tools available before making any energy upgrade decisions. The results can tell you exactly how leaky your home is and where to focus sealing efforts.
Materials used for air sealing include caulk for small gaps, acoustic sealant for flexible joints, foam backer rod for wide gaps before caulking, and canned spray foam or two-component foam for larger penetrations. Weatherstripping handles operable joints like doors and windows.
Your HVAC Upgrade Guide
Once your thermal envelope is tightened, your HVAC system operates more efficiently — and you may find that a smaller or more efficient replacement system is all you need.
HVAC Efficiency Ratings Explained
Understanding efficiency ratings helps you compare equipment and calculate payback periods:
- SEER2 (Seasonal Energy Efficiency Ratio) applies to air conditioners and heat pumps in cooling mode. Higher SEER2 = less electricity per unit of cooling. Federal minimums as of 2023 are 14.3 SEER2 in the northern U.S. and 15.2 SEER2 in the South.
- AFUE (Annual Fuel Utilization Efficiency) applies to furnaces and boilers. A 96% AFUE furnace converts 96 cents of every dollar of fuel into heat. Older systems often run at 60–70% AFUE.
- HSPF2 (Heating Seasonal Performance Factor) measures heat pump efficiency in heating mode. Higher is better; look for 8.1 HSPF2 or above for strong cold-climate performance.
Heat Pump vs. Furnace: Which One Fits Your Home?
A heat pump moves heat rather than generating it, making it 2–4 times more efficient than electric resistance heating. Modern cold-climate heat pumps (also called variable-speed or inverter-driven heat pumps) can work efficiently in temperatures as low as -15°F, making them viable in most U.S. climates.
A Gas Furnace still makes sense in very cold climates where natural gas is cheap and electric rates are high, or in homes where a full heat pump installation isn’t practical. Many homeowners in colder regions opt for a dual-fuel system: a heat pump for mild weather and a gas furnace as backup when temperatures drop below the heat pump’s efficient operating range.
If you’re replacing central AC only, consider whether a heat pump replacement makes financial sense given available utility rebates and the Inflation Reduction Act’s tax credits (up to $2,000 for heat pump upgrades through 2032). Before purchasing, visit DSIRE.gov to find state and utility rebates that stack with federal tax credits—many homeowners reduce net costs by 30–50% using this free database.
Duct Sealing and Zoning
Leaky ductwork is one of the most overlooked causes of HVAC inefficiency. Studies have found that the average U.S. home loses 20–30% of conditioned air through duct leaks — air that travels through attics, crawl spaces, or wall cavities rather than reaching living areas.
Duct sealing involves applying mastic sealant or metal foil tape (not standard duct tape, which fails over time) to joints and connections throughout the duct system. For significant leakage, Aeroseal — a process where aerosolized sealant is injected into the duct system under pressure — can seal leaks from the inside and is worth considering for complex duct layouts.
Zoning systems divide your home into independently controlled areas, each with its own thermostat. This prevents the common problem of overcooling one room to heat another. Zoning is particularly useful in multi-story homes or homes with significant sun exposure on one side.
Should You Insulate or Upgrade HVAC First?
This is one of the most practical questions in home energy improvement, and the answer is almost always: insulate and air seal first.
Here’s why. Your HVAC contractor sizes your system based on a load calculation — specifically, how much heating and cooling your home needs at peak conditions. If your insulation is poor when that calculation is done, your contractor will size a larger system to match your current heat loss. A larger system costs more to buy, costs more to run, and requires short-cycles (turns on and off frequently) rather than running efficient long cycles.
If you improve insulation first, your home’s heating and cooling load drops. You may qualify for a smaller, less expensive replacement system that runs more efficiently and lasts longer. The energy savings from insulation also begin immediately, while you plan the HVAC upgrade.
Recommended sequence:
- Get a home energy audit
- Air seal attic penetrations and rim joists
- Add attic insulation to target R-value
- Seal ductwork
- Upgrade insulation in walls and crawl space if needed
- Right-size and replace HVAC equipment
Getting a Home Energy Audit
A professional home energy audit typically costs $200–$600 and includes a blower door test, duct leakage test, thermal imaging inspection, and a prioritized list of improvements with estimated savings for each. Many utility companies offer free or subsidized audits — check your local utility’s website before paying out of pocket. Ask if your auditor provides a DOE Home Energy Score—a simple 1–10 rating that makes it easy to track improvements and compare your home’s efficiency to neighbors.
For a preliminary assessment, a DIY energy walkthrough can identify obvious issues: attic insulation depth, visible air gaps at the attic hatch, feel of exterior walls in winter, and whether the attic is noticeably warm in summer even after dark. These are strong indicators that the thermal envelope needs attention.
DIY vs. Professional: What You Can Handle Yourself
DIY-friendly tasks:
- Blowing in attic insulation (rental equipment available at most home centers)
- Caulking and weatherstripping
- Installing batt insulation between accessible joists
- Sealing visible duct joints with mastic
- Installing a programmable or smart thermostat
Professional work recommended:
- Spray foam insulation (requires specialized equipment and training)
- Duct sealing with Aeroseal
- HVAC system sizing, installation, and refrigerant work
- Electrical work related to heat pump installation
- Blower door testing and thermal imaging
Difficulty level for DIY insulation work: Intermediate. Attic blowing and air sealing require attention to detail — particularly around electrical fixtures and proper PPE use — but are manageable for a prepared homeowner.
Estimated Costs and ROI
| Project | Estimated Cost (U.S.) | Typical Payback |
|---|---|---|
| Attic air sealing | $200–$500 DIY / $500–$1,500 pro | 1–3 years |
| Blown-in attic insulation | $1,000–$2,500 (1,500 sq ft attic) | 3–5 years |
| Wall insulation (dense pack) | $1,500–$4,000 | 5–8 years |
| Crawl space encapsulation | $3,000–$8,000 | 5–10 years |
| Duct sealing | $300–$1,000 | 2–4 years |
| High-efficiency gas furnace (96% AFUE) | $3,000–$6,000 installed | 5–10 years |
| Central heat pump (15+ SEER2) | $5,000–$12,000 installed | 7–12 years |
Costs vary significantly by region, home size, and contractor. Federal tax credits and utility rebates can reduce net cost by 15–30% on qualifying HVAC equipment. *Costs vary ±25% by region. For localized estimates, input your ZIP at HomeAdvisor or Angi before budgeting.
Common Mistakes Homeowners Make
- Skipping air sealing before insulating. Adding insulation over unsealed gaps doesn’t solve air movement — it just buries the problem. Always air seal first.
- Using the wrong insulation type for the location. Fiberglass batts in a crawl space without a vapor barrier, or open-cell spray foam on a below-grade wall where moisture is present, can cause long-term moisture and mold issues.
- Replacing HVAC before improving the envelope. As discussed, this leads to oversizing, which reduces efficiency and comfort rather than improving it.
- Blocking soffit vents with attic insulation. Attic ventilation baffles must be installed at each rafter bay before blowing in insulation to keep airflow from the soffit to the ridge intact.
- Choosing efficiency ratings without considering climate. A high SEER2 rating is most valuable in hot climates where cooling runs for months. In cold climates, HSPF2 and AFUE matter more.
Maintenance Tips to Keep Performance High
Think of maintenance like oil changes for your car: skip them, and you’ll pay more later. Stay on top of filters, tune-ups, and inspections, and your system rewards you with lower bills and fewer surprises.
Spring: Replace filters, clean coils, and schedule a cooling tune-up.
Fall: Schedule furnace tune-up, inspect weatherstripping, test thermostat calibration.
Year-round:
- Replace HVAC filters every 1–3 months, depending on use and filter type. Dirty filters restrict airflow, which reduces efficiency and strains the blower motor.
- Inspect insulation every 5–7 years, particularly in attics where settling, pest activity, or moisture can degrade performance.
- Clean return air vents and registers to ensure unrestricted airflow throughout the system.
Follow ACCA’s seasonal maintenance checklist to maximize equipment lifespan.
FAQs
What R-value insulation do I need for my attic?
For attics, target R-38 to R-49 in climate zones 3–4, or R-49 to R-60 in zones 5–7 per DOE guidelines. Verify your zone at energy.gov/energysaver/insulation or consult a local energy auditor for the most accurate recommendation.
Should I insulate before replacing my HVAC?
Yes, in almost every case. Improving insulation reduces your heating and cooling load, which allows your HVAC contractor to right-size a smaller, more efficient system. Doing it in reverse often results in an oversized system that costs more and performs worse.
How much can better insulation reduce energy bills?
The EPA estimates that air sealing and insulation upgrades can reduce heating and cooling costs by 15–20% on average. Homes with significant existing deficiencies may see savings of 25–30% or more.
What’s the difference between spray foam and fiberglass insulation?
Fiberglass batts are affordable and easy to install, but don’t stop air movement on their own. Closed-cell spray foam provides both insulation and air sealing in one material, with a higher R-value per inch, but costs 3–5 times more per square foot. For most attic floors, blown cellulose with separate air sealing is the best balance of cost and performance.
Is duct sealing worth it?
Yes — particularly in homes with ducts running through unconditioned attics or crawl spaces. Sealing duct leaks can recover 20–30% of conditioned air that’s currently being wasted, often with a payback of just 2–4 years.
How do I know if my HVAC system is undersized or oversized?
If your system runs in very short cycles (on for 5–8 minutes, off, then on again) it’s likely oversized. If it runs continuously on the hottest or coldest days without reaching the set temperature, it may be undersized — though poor insulation is just as likely the cause. A Manual J load calculation by a qualified HVAC contractor gives you a definitive answer.
Energy costs and product ratings change regularly. Always verify current federal tax credit eligibility at energystar.gov and consult local building codes before starting insulation or HVAC projects.
Bottom Line: Your Action Plan
Bottom line: seal and insulate first, then right-size your HVAC. Start with a free utility audit, tackle attic air sealing this weekend, and watch your bills drop. Your comfort—and wallet—will thank you. This exact sequence powers ENERGY STAR Certified Homes, which deliver 10–20% lower energy bills on average.